The Application
- When the program first starts, it waits for a button (connected to pin 6) to be pressed.
- When the button is pressed, a secret value is generated and displayed on the LCD screen attached to the board (e.g. 0x2BE354FB in the photo above).
- Lockbox then enters a loop receiving input from the user:
- if the user supplies the correct code, the state changes to “unlocked” (see photo below).
- if an incorrect code is supplied, the message “Incorrect code…” is sent, and the user can try again.
Exploitation
The readSerialBuf function (shown below), which handles user input, has a vulnerability – it reads characters into the buffer buf until it encounters a newline, but only has 8 bytes allocated for user input. Any user input beyond 8 bytes overwrites other values on the stack.
// A simplified version of the readSerialBuf function
char* readSerialBuf() {
  char buf[8];
  uint32_t bufLoc = 0;
  while (true) {
    if (Serial.available()) {
      buf[bufLoc] = Serial.read();
      if (buf[bufLoc] == '\n') {
        Serial.write(buf, bufLoc+1);
        return;
      }
      bufLoc++;
    }
  }
}
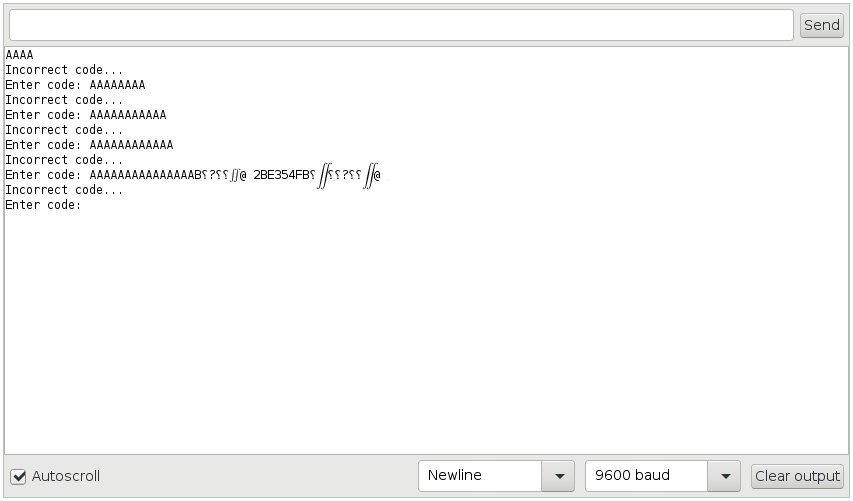
To start working out how to exploit the vulnerability, I just tried entering successively longer strings of ‘A’s to see if we could overwrite values on the stack, and potentially cause the program counter value to be overwritten with a value we control. As you can see below, if you enter a long enough string of ‘A’s, the device sends back some garbage…

… but also the secret value – where did this come from? We haven’t quite worked out the exact mechanism by which the secret code is printed, but we do know that this comes from an old stack frame used by the Print::printNumber function, which was called when we printed the code to the LCD screen in the loop function:
void loop() {
  unsigned int state = digitalRead(buttonPin);
  if (state == LOW) {
    randomSeed(millis());
    K = random();
    lcd.setCursor(0, 1);
    lcd.print(K, HEX); // print calls Print::printNumber()

    lcd.setCursor(0, 0);
    lcd.print("LOCKED          ");
    while (true) { doSerial(); }
  }
}
Part of the reason is that the bufLoc variable in readSerialBuf, which is eventually used to determine how many characters to print, is overwritten with a larger value compared to the usual 8 or so from a genuine code entry attempt. We can see from memory dumps before and after it has been exploited that the secret value is close to the buffer that is read into from serial, but is at a lower address in memory:

(note the memory dump is from a different run to when the pictures above were taken, so the secret is different – 0x788C496A)
Automating exploitation
Using the Arduino Serial Monitor to enter strings of “A”s and skim through the output looking for the secret is a little tedious, so I have automated the process. The script I have written to interact with and exploit the lockbox application (exploit.py) uses the pySerial module to interact with the board. The exploit uses three properties of the application:
- The location of the secret value on the stack,
- The location of the
bufLocvariable just after the buffer, - That the user can overwrite memory after the buffer.
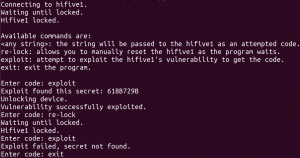
The exploit script uses a regex to identify which part of the returned data is the secret value, and then sends that back over serial to unlock the device. Below you can see the output of two runs through the exploit program:
- In the first run, the board flashed with the normal implementation of the Lockbox application.
- In the second run, the board is flashed with an implementation that uses Stack Erase to protect the secret, which is described in the next section.

Protecting the secret with Stack Erase
The secret is leaked from the stack frame of the Print::printNumber function. To protect the secret, we can edit the source and header file to add the stack erase attribute.
Header file:
class Print
{
  private:
    int write_error;
    __attribute__((stack_erase))
    size_t printNumber(unsigned long, uint8_t);
    // ... lots more functions ...
Source file:
__attribute__((stack_erase))
size_t Print::printNumber(unsigned long n, uint8_t base) {
  char buf[8 * sizeof(long) + 1]; // Assumes 8-bit chars plus zero byte.
  char *str = &buf[sizeof(buf) - 1];

  *str = '\0';

  // prevent crash if called with base == 1
  if (base < 2) base = 10;

  do {
    unsigned long m = n;
    n /= base;
    char c = m - base * n;
    *--str = c < 10 ? c + '0' : c + 'A' - 10;
  } while(n);

  return write(str);
}
After recompilation and flashing to the board, the code executes in a similar manner to before. However, when the exploit is run, the characters of the secret have been overwritten with null bytes (during the epilogue of the printNumber function) so the secret is not leaked.
Conclusion
Stack Erase is an effective way of preventing accidental data leakage and provides a tool to improve the security of applications, alongside other measures such as ASLR, control flow integrity, stack canaries, executable space protection, amongst many others. Stack Erase is especially useful when other measures have failed, as you can’t read a value that’s no longer there.
Patches to add Stack Erase to upstream GCC will be submitted shortly.
The RISC-V GCC toolchain for Stack Erase can be obtained and built from our Github account: https://github.com/embecosm/riscv-toolchain/tree/stack-erase
Source code and tools for exploiting the Lockbox application are at: https://github.com/embecosm/lockbox
